[SPRING] dispatcherServlet, ViewResolver, Controller
[SPRING] 스프링 설치 및 프로젝트 설정 이번 포스트에서는 스프링을 설치하고, 프로젝트 생성 및 초기 설정에 대해 다뤄보려고 한다. 스프링 설치 우선, 스프링은 아래의 링크에서 다운받을 수 있
itsmesunky.tistory.com
지난 포스트에서는 Controller/JSP를 이용하여 정적 컨텐츠를 웹 브라우저에 출력하는 법에 대해 다뤄보았다.
오늘은 정적 컨텐츠가 아닌 Controller에서 JSP로 데이터를 송신하고 수신하는 방법에 대해 다뤄보려고 한다.

Controller가 따로 존재하지 않았던 MVC Model1에서는 데이터를 송수신 하는 방법으로
request.setAttribute(), request.getAttribute()... 이 있었는데
Spring FrameWork에서는 Model 이라는 객체로 간단하게 데이터를 송수신 할 수 있다.
먼저, helloController를 다음과 같이 작성한다.
helloController
@Controller
public class HelloController {

	@RequestMapping("/hello")
	public String hello(Model model) {
		String name = "썬키";
		model.addAttribute("name", name);
		return "hello";	// hello.jsp로 이동
	}
}
hello 메소드의 파라메터로 Model 타입의 model 변수를 선언하고
model 의 addAttribute 메소드를 이용하면 request.setAttribute()와 같은 기능을 기대할 수 있다.
Model
public interface Model {

	/**
	 * Add the supplied attribute under the supplied name.
	 * @param attributeName the name of the model attribute (never {@code null})
	 * @param attributeValue the model attribute value (can be {@code null})
	 */
	Model addAttribute(String attributeName, @Nullable Object attributeValue);

    .
    .
addAttribute의 메소드의 첫 번째 인자로는 속성명, 두 번째 인자로는 속성값을 넣어주면 된다.
jsp에서는 첫 번째 인자인 속성명을 ${속성명} 같이 입력하면 전달 받을 수 있다.
hello.jsp
<%@page import="org.springframework.ui.Model"%>
<%@ page language="java" contentType="text/html; charset=UTF-8"
    pageEncoding="UTF-8"%>
<!DOCTYPE html>
<html>
<head>
<meta charset="UTF-8">
<title>Insert title here</title>
</head>
<body>
<h1>hello.jsp</h1>
<p>Controller에서 전달 받은 값은 ${name}입니다.
</body>
</html>

이런식으로 Controller에서 model.addAttribute 를 이용해
데이터를 브라우저에 전달하는 방법을 알아보았다.
이번에는 반대로 사용자가 데이터를 서버에 전달하고
서버는 사용자가 요청한 데이터를 받아 콘솔에 출력해보자.
hello.jsp
<%@page import="org.springframework.ui.Model"%>
<%@ page language="java" contentType="text/html; charset=UTF-8"
    pageEncoding="UTF-8"%>
<!DOCTYPE html>
<html>
<head>
<meta charset="UTF-8">
<title>Insert title here</title>
</head>
<body>
<h1>hello.jsp</h1>
<p>Controller에서 전달 받은 값은 ${name}입니다.</p>

<div id="container">
	<form action="register" method="get">
		<label for="name">
			<input type="text" name="name"  placeholder="이름을 입력해주세요"/>
		</label>
			<br >
		<label for="age">
			<input type="text" name="age"  placeholder="나이를 입력해주세요"/>
			<br >
		</label>
		<br>
		<input type="submit" value="제출"/>
	</form>
</div>

</body>
</html>
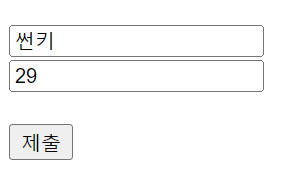
hello.jsp를 조금 수정하여, 이름과 나이를 입력하여 제출 버튼을 클릭하면 register로 전달하게 하였다.
HelloController
@RequestMapping("/register")
	public String reg(String name, int age) {
		String name_ = name;
		int age_ = age;

		System.out.printf("이름은 %s이고, 나이는 %d세 입니다.", name_, age_);

		return "hello";
	}
HelloController에서 register라는 URL 요청이 들어왔을 때 실행할 메소드를 하나 작성했다.
여기서 Parameter를 확인해보면 name과 age가 있는데
여기에 hello.jsp에서 작성한 name과 age가 담기게 된다.
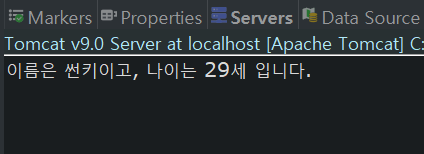
이렇게 서버, 클라이언트간 데이터를 주고 받는 모습을 확인할 수 있었다.
Controller가 없었던 MVC MODEL1에 비하면
굉장히 간단하고 편리하게 데이터를 주고 받을 수 있다는 장점이 있다.
'BACK-END > SPRING' 카테고리의 다른 글
| [Spring Boot] 서버 재시작 없이 변경된 코드 반영 (0) | 2023.04.13 |
|---|---|
| [SPRING] @ResponseBody란? (0) | 2023.02.23 |
| [SPRING] dispatcherServlet, ViewResolver, Controller (0) | 2023.02.21 |
| [SPRING] 스프링 설치 및 프로젝트 설정 (0) | 2023.02.20 |
| Ajax (0) | 2022.05.24 |


댓글